| 這篇文章仍有需要翻譯的地方。您可以幫忙編輯。 如果是"模板:紅色的英文名稱",請直接點入新的一頁,把中文名稱打進去,並用兩層的方框[[ ]]給它框起來。 |
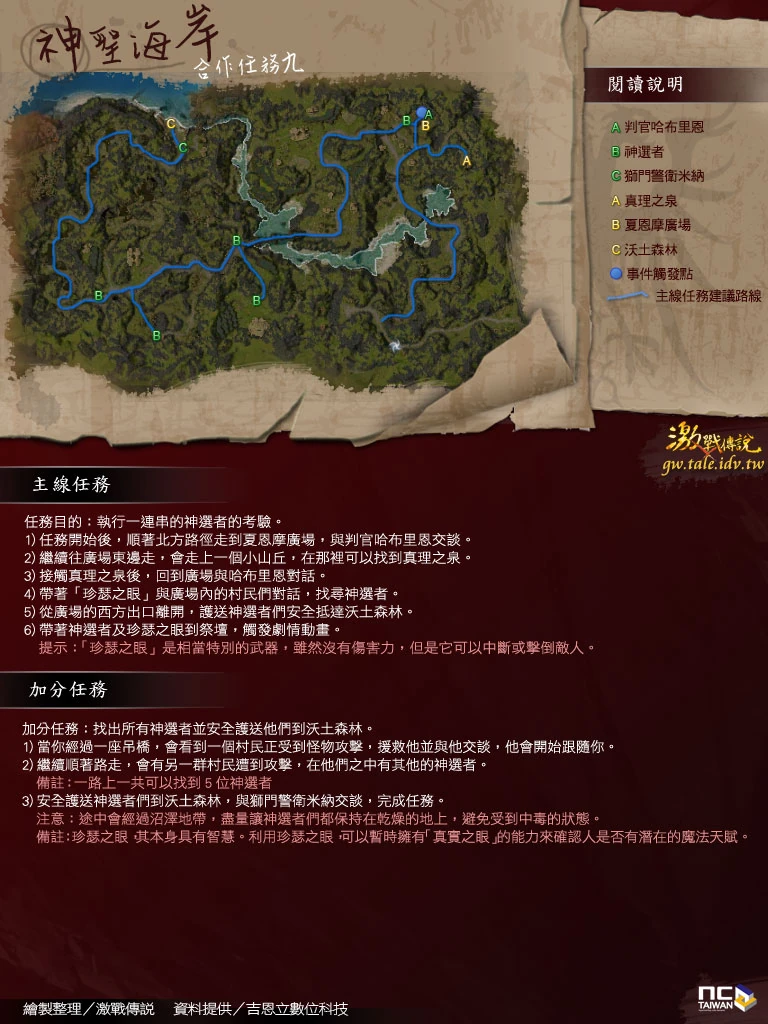
神聖海岸任務地圖
Description[]
The Divinity Coast is the site of several of the region's oldest settlements. Humans have occupied these lands for over seven hundred years. Many generations of Krytan fishermen have grown up trolling the same sacred waters of the 模板:Giant's Basin, the huge saltwater lake that defines the northern edge of the coast.
NPC's[]
Exits[]
Mission Objectives[]
- Administer the Test of the Chosen.
- Retrieve the 模板:Eye of Janthir from 判官哈布里恩 in the upper courtyard of 夏恩摩.
- Deliver the Eye to the coastal city of 沃土森林.
- ADDED Cleanse yourself in the 模板:Fountain of Truth on the hill to the southeast.
- BONUS Find and escort all the chosen to 沃土森林.
Primary[]
This mission is fairly straightforward. After a short journey to a village, Justiciar Hablion (A on the map) will tell you to cleanse yourself in a fountain (B on the map), then escort a green hovering eyeball. This eye will "judge" people and reveal any magic they may have. You can determine whether or not villagers are chosen by taking the eye close to them. The eye will also do an 範圍性 knockdown on all foes adjacent to it every few seconds. This can be useful, so make sure to have the eye close to where you're fighting.
Talk to the Shaemoor Gate Guard (C on the map) to open the city door. Now simply escort the eye to 沃土森林 and maneuver it to the shrine (D on the map) to complete the mission.
Bonus[]
There are five villagers who must be found in order to get the bonus. The numbers below match those on the map. Note: Some NPCs are Merchants. Don't strain yourself to save them as they are not chosen. Only villagers will be chosen.
Chosen Villagers:
- The first chosen is found in the village where you get the eye. Go around testing all of them until one villager follows you.
- The second chosen is the villager across the big stone bridge. He will be under attack, so heal him if necessary and kill the monsters fighting him. Once tested, he also will follow you. Saving this chosen also adds the bonus objective to the mission.
- The third chosen can be found by taking the leftmost path after crossing the bridge (south). He may or may not be under attack, so move quickly. (This does not currently show in the Prima guide.)
- Head back to the main path (from the bridge) and continue west. After a boss fight, the path will split again; take the leftmost fork (you will see 流浪雙頭巨人s). The fourth chosen is past the ettins, and may be under attack, so move quickly.
- Continue past the fourth chosen along the path, and it will meet up with the main path again. You will see two merchants and a villager. Make sure the villager stays alive, but do not worry about the merchants unless you have a kind soul. Taking the eye to this villager reveals the fifth and final chosen.
After finding all of the chosen, it's undead swamp time. Maneuver yourself through the swamp, taking time to heal the villagers if they need it between fights. Just inside the village at the end of the mission, talk to Lionguard Minah (6 on the map) to complete the bonus objective.
Note: For every villager you save, Lionguard Minah will give your party 200 gold, distributed among all party members including henchmen. Do not take the eye over the shrine before talking to Lionguard Minah, or the mission will end and you won't get the bonus.
Skill Capture[]
- 防禦態勢 from 模板:Sky Quickfeather (not available before 被遺忘者 quest at 命運峽谷).
- 還擊 from 模板:Sky Quickfeather (not available before 銅錘礦坑).
- 保護連結 from 模板:Fluum Banzo (not available before 梅古瑪叢林 or 安奴綠洲).
- 災禍治癒 from 模板:Raja Crux (not available before 王室記錄 quest at 漁人避風港).
- 迷惑之箭 from 模板:Ghita Bonz (not available before 王室記錄 quest at 漁人避風港).
- 滅絕之地 from 模板:Ghita Bonz (not available before 失蹤的公主 quest at 漁人避風港).
- 操縱骸骨爪牙 from 模板:Zukra Cadava (not available before 王室記錄 quest at 漁人避風港).
- 死亡新星 from 模板:Zukra Cadava (not available before 掉落的屋簷 quest at 雙頭怪隱匿地).
- 精神束縛 from 模板:Gren Waveslosh (not available before 鮮血與迷團 quest at 雙頭怪隱匿地).
Bosses[]
- 模板:Sky Quickfeather (模板:Tengu)
- 模板:Ghita Bonz (不死系)
- 模板:Dyv Cloudclaw (模板:Tengu)
- 模板:Fluum Banzo (石像魔)
- 模板:Gren Waveslosh (石像魔)
- 模板:Bija Gravewailer (不死系)
- 模板:Frak Undertow (石像魔)
- 模板:Zukra Cadava (不死系)
- 模板:Glyd Swiftwing (模板:Tengu)
Additional Notes[]
The players will be in 德魯伊高地 at the completion of this mission.
心得[]
- 隱任:需要5個神選者
- 第一個神選者在過橋後,單人攜帶加速技+補HP技與輔助珍瑟之眼的中斷震暈可保持HM的NPC不死.
- 要帶領神選者-1.用珍瑟之眼(範圍內)接觸神選者-2.點擊NPC(否則他不會移動)
- 後面的怪物有時候會太接近神選者,這要靠點運氣.
- 注意沼澤會讓村民中毒,所以注意走在路徑上.
- 到達地點切記與 獅門守衛米納 對話,才能完成隱任.(如果直接衝向祭壇,隱任失敗)