地獄懸崖任務攻略
地區[]
| 地獄懸崖(地區) | ||||||
|---|---|---|---|---|---|---|
| ||||||
| 基本資料 | ||||||
| ||||||
| 鄰接地區 | ||||||
| ||||||

地區描述[]
The switchback route that runs along the ridge of Abaddon's Mouth is known to any who have ventured here as Hell's Precipice. One look into the caldera of the furious volcano will explain why.
如何進入[]
Complete the Abaddon's Mouth mission.
出口[]
沒有
NPCs[]
- 傭兵 (Level 20):
- Merchants and Traders:
- Djordi (Merchant)
- Storage:
- Xunlai Agent (Storage)
- Various:
- Jacob Salinger
Notes[]
- This is the final mission of the Prophecies Campaign.
- After completion of this mission, visit the Vision of Glint in Droknar's Forge for the Titan Quests.
主線任務[]

.jpg)
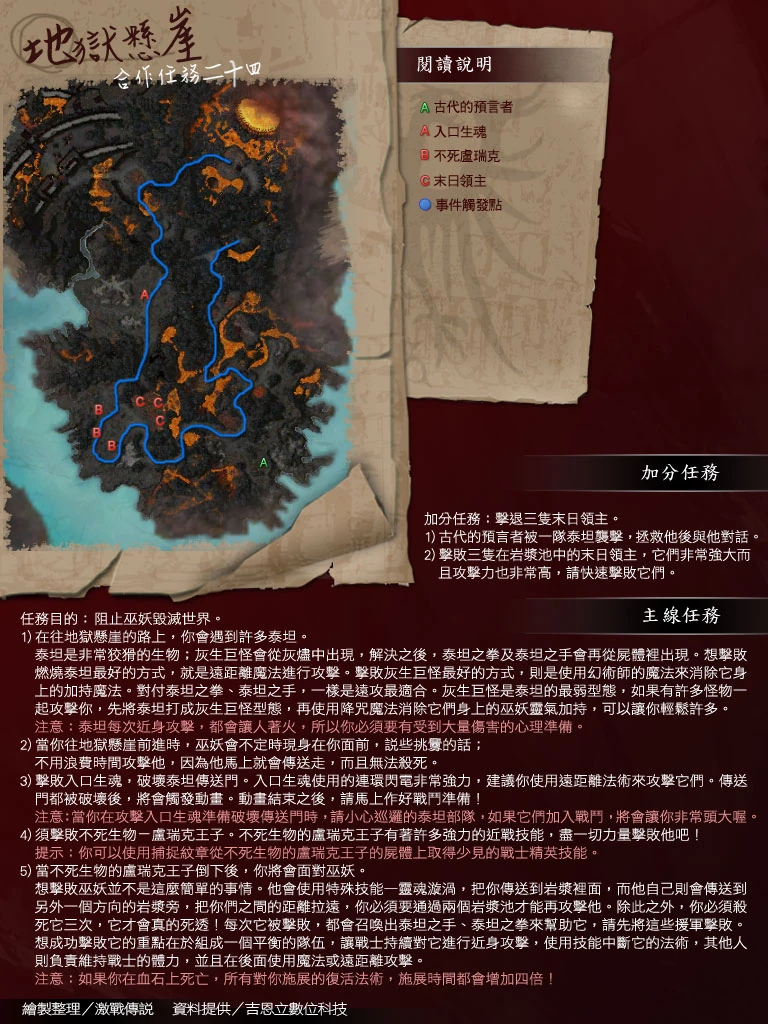
主線及隱藏路線圖
Objectives[]
Stop the Lich from destroying the world.
- Disable the Titan Portals.
- Defeat Undead Rurik.
- Destroy the Lich.
- BONUS Destroy all three Armageddon Lords.
Walkthrough[]
Primary[]
The mission itself is straightforward, but requires much preparation. Your main foes in this mission will be the Burning Titans, which you first met at the end of the previous mission. Unlike that docile creature, which you probably dispatched quickly, these Burning Titans are trouble. They inflict massive damage, and when destroyed, a Risen Ashen Hulk rises in their place. When that is destroyed, a pair of warrior creatures spawn: a Hand of the Titans and a Fist of the Titans. In addition, members of your party adjacent to these monsters will burn and suffer health degeneration.
A typical battle will consist of fighting a few of these creatures, but each battle will drag on for a long time, as each creature breaks into smaller creatures.
Tip 1: It is imperative that you tackle the Titans and their spawns one by one. Good party organization is very important. If different party members fight a different monster, you'll end up with four or five Hands and Fists running around, and they will be tough to beat. Instead, focus on a Burning Titan and break it down to a Hulk. Then break that down to a Hand and a Fist, dispatch them, and move on to the next Hulk or Titan. It is generally best to dispatch Burning Titans first, as they are much more dangerous than Risen Ash Hulks.
Tip 2: It is useful to have a ranger who has Winter, as it turns all elemental damage to cold; most enemies in this mission are weak against cold damage.
Tip 3: Remind your elementalists not to bring their fire attacks (unless someone has Winter). It is recommended to bring water spells instead, such as Ice Spikes and Maelstrom, and Shard Storm. Also, warriors should use normal weapons (or, better yet, icy weapons like Icy Dragon Sword), instead of the Fiery Dragon Swords.
Tip 4: Remind your warriors to bring some damage-soaking or health-enhancing skills/spells like Endure Pain. The Titans can dish out lots of damage in a hurry, as can the Portal Wraiths at the end. These protections can give extra time for the party's monks to heal the warriors.
Tip 5: Surprisingly, the necromancer's Well of Blood works well on this mission. It can be used when the Risen Ash Hulks die and the Fists/Hands of the Titans appear. Depending on how many points the necromancer has in Blood Magic, this can negate the effects of burning on the players, which will free up a lot of energy for the monks. It's also useful on the imps that are running about. At first glance you would think there are not many corpses to exploit, but in fact there are quite a few.
Tip 6: If there is a Minion Master, a Flesh Golem can be useful in tanking the Titans when other players need a short break. Flesh Golem also has bugged damage vs Lich.
Tip 7: Hands and Fists of the Titans use Healing Signet. Interrupting it makes killing them easier. Alternatively, consider bringing Rust, which will cause the signet to take six seconds to activate, leaving the titans very vulnerable.
Tip 8: If your party does not carry any interruption, Spark of the Titans should be the priority target in any mixed group. With Mind Burn and Rodgort's Invocation, the party will be devastated if these are left alive too long.
Tip 9: When you don't have Winter, but you have access to other Guild Wars Campaigns, consider bringing two useful additional skills, that are not available in Prophecies. If you have access to Factions Campaign, make sure that monk brings Extinguish. If you have access to Nightfall Campaign, make sure that the charging warrior-tank brings Frigid Armor.
Tip 10: An excellent way of ensuring a full spread of elemental damage is to have a Ranger who has not capped Greater Conflagration bring a capture signet and get it off the boss. Ensure that the Ranger also has Winter equipped. Greater Conflagration will make ALL physical attacks into elemental attacks and Winter will convert the damage into cold damage. For those who are already carrying elemental weapons, Greater Conflagration will have no effect. For first time Rangers who also have Barrage, this is an excellent way of doing this mission with 2 elite skills equipped which have maximum effect. The Ranger must ensure that the spirits are cast upon entering battle and that remain alive should the fight be prolonged or if the Titans kill them. A full team doing cold damage regardless of what weapons they carry can clear this mission out very easily. This will also combine very effectively with Conjure Frost for those who equip it, but will work with any of the Conjure spells since Winter will convert the damage into cold damage anyway.
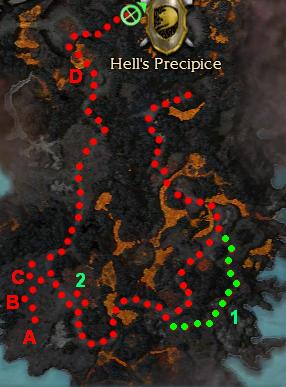
When you start the mission, just follow the path on the map in red. Beware of overlapping patrols of Sparks of the Titans, as they are easy to dispatch in small numbers but can be devastating in large groups.
As you fight your way along, the Lich Lord will be waiting and will usually summon Quickening Zephyr and then teleport away after a short time.
Continue on your path until you get to point 2 on the map, which is guarded by two Ashen Hulks. Make sure to lure them away up the path from which you came, because the pool of lava to your right will spawn quite a large number of Hands and Fists and also two bosses (fortunately one-by-one or in small groups only). They will walk by and gather in the area around the portals. Lure them away and take them out one or two at a time. If you do this effectively, you can clear out the whole area, and be left with only one large patrol, which moves in front of the three portals (points A, B and C) you want to destroy. You can either:
- Time the patrol and destroy the portals after they leave, tackling only the Portal Wraiths.
- Lure the patrol and engage it. Then destroy the portals at your leisure.
After destroying the portals, you will see a cut scene where the Lich Lord will seem to be having a good time; he will then introduce you to Undead Prince Rurik. The key here is not to panic. If you stay where you are or back off a bit, you will be attacked by four Hands. Call them out one target at a time, and you should be fine. Next, either lure the four Fists on the other side of the ramp, or just have a Ranger lure Rurik himself off the ramp down to you (he has two Sparks with him).
Note: The Hands will spawn atop the ledge if you skip the cut scene, making it potentially very difficult to pull them without getting the Sparks and Rurik as well. Don't skip the cut scene if your party cannot pull effectively.
Rurik takes a lot of damage but is not a big threat. Make sure to kill the two Sparks and you will be off to another cut scene. If you kill Rurik and the Sparks, the Fists will go away.
模板:Dispute
Now, cross the bridge and go full circle back to where you began. There, at the bloodstone, you will confront the Lich Lord. You must kill him in the center of the bloodstone to charge the Soul Batteries and close the Door of Komalie. The Lich Lord will respawn, often teleporting into the nearby lava, if he is not killed in the center of the bloodstone. Player accounts differ as to how many times the Lich Lord must be killed, from 1 to 3, and whether or not all or some of those deaths must be in the very center of the circle. The most common observation is that one death in the very center is enough to complete the mission, or three deaths within the circle but not at the center. For the latter circumstance, you will notice some of the Soul Batteries recharge and light up when he is killed away from the very center. You can slowly recharge all the Soul Batteries this way to complete the mission.
The Lich is not an overpowering foe. With a little bit of organization and focus, he can be taken out without too much trouble. The best advice is to deal with him quickly and not be overwhelmed by the Hands and Fists he spawns. Note that he does not run from AoE spells. However, he does a few annoying things that make killing him harder than it otherwise would be:
- He summons two Hands each time he revives after being killed somewhere other than the center of the bloodstone. You should leave him alone for a moment and concentrate on eliminating the two Hands. If you are not careful, they can cut through your backline of spell casters. You should also take caution not to aggro the two Hands wandering the area beyond the bloodstone.
- He teleports himself to the middle of the lava next to the bloodstone and then walks back to the center. This gives him a respite from the beating he is taking.
- He teleports members of your party randomly into the lava.
Bonus[]
Acquiring the bonus in this mission is harder than completing it. To acquire the bonus you need to follow the green path to point 1 on the map. At the point where the green path splits from the red one you will encounter a Burning Titan and a Titan Boss who will walk towards you shouting strange words ("Shith Mal Hacto!"). This will summon mobs from the immediate surrounding area to their position, clearing the path towards the bonus. Just stay well away from the now very strong group of opponents who will slowly wander southeast.
At point 1 you will find a Burning Titan and an Ancient Seer who will give you the bonus. You need to take it slowly; make sure to take out the group of Ashen Hulks and Sparks in front before getting near to the Burning Titan and the Seer. Do not rush for the Seer. Upon approaching, the Seer will engage the Burning Titan. Although the Titan doesn't fight back, the Seer will take damage from burning. If you don't take care of the group of Hulks and Sparks before this happens, the Seer will very likely die.
Speak with the Seer and you will get the bonus objective.
Tip: When you save the Seer, do NOT talk to him immediately. This will prevent the bonus from being triggered earlier than you may want it. At the area where the Armageddon Lords appear, there is a pool of lava which will spawn several hands and fists of the titans and three bosses, over a long period of time. If you do not trigger the bonus, the Armageddon Lords will not be there and you can kill the normal titans as they spawn. Then you can return to the seer and trigger the bonus, which causes the lords to spawn, then you can kill them. If you do not do this you will have to wait for the monsters to stop spawning to kill the Lords. All the creatures that spawned will gather en masse at the portals making them much harder to kill.
Note: If you let the Seer die, you will not receive credit for the bonus, even if you kill the Armageddon Lords.
When you have acquired the bonus you will find three Armageddon Lords in the pool of lava next to point 2. Their damage-dealing capacity is very impressive but they drop quite quickly, so concentrate your attacks. As the Armageddon Lords are not bosses, you can expect them to have the usual chain of spawning (Armageddon Lord → Risen Ashen Hulk → Hand+Fist of the Titans) after they are defeated.
Beware of the spawning Fists and Hands that come out from the same lava pool and head to the portals. They can make an easy fight much more difficult. The spawns will eventually stop after two bosses have been spawned if you choose to wait. You cannot lure the Armageddon Lords very far away but you can lure them just outside of the lava that they spawn in, making your melee characters much more effective. So make sure the coast is clear before taking them on.
Creatures[]
Bosses (Elite Skill Captures)[]
The following Titan bosses occur randomly before or on the bonus path (point 1), or near points A, B or C.
At point D, the players encounter:
 不死族盧瑞克王子: 快速劍
Dialogues[]
Briefing from Jacob Salinger.
Follow-up[]
- Upon completion of the mission players will find themselves in: Droknar's Forge.
Notes[]
- Players looking for a cartographer title should backtrack after the cut scene featuring the portals and explore the western edge of the map.
- It is sometimes easier to approach the bonus by ignoring the green path, but by coming around the opposite end to reach the seer. This approach leaves you with only one Titan to worry about instead of two Titans and Sparks at the same time. The Seer's health will not trigger until you aggro either the Seer or the Titan next to him.
| 首部曲‧阿斯卡戰記 主線任務 | 
|
| The Great Northern Wall → Fort Ranik → Ruins of Surmia → Nolani Academy → Borlis Pass → The Frost Gate → Gates of Kryta → D'Alessio Seaboard → Divinity Coast → The Wilds → Bloodstone Fen → Aurora Glade → Riverside Province → Sanctum Cay → Dunes of Despair, Thirsty River, Elona Reach → Augury Rock → The Dragon's Lair → Ice Caves of Sorrow → Iron Mines of Moladune → Thunderhead Keep → Ring of Fire → Abaddon's Mouth → 地獄懸崖 |